ShopDreamUp AI ArtDreamUp
Deviation Actions


Suggested Deviants


Suggested Collections


You Might Like…


Featured in Groups


Description
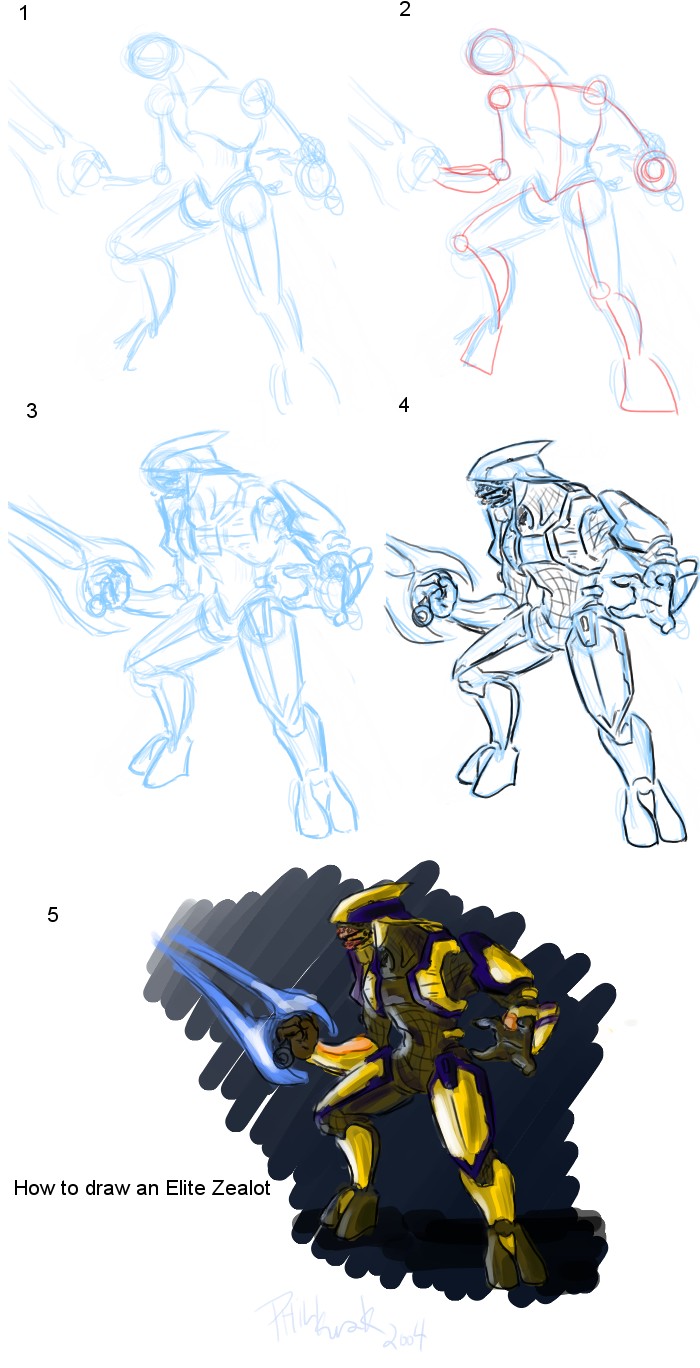
I thought I'd give a really basic run down on how to draw my favorite covvie, an Elite Zealot.
1)One usually wants to start off by defining the figure by what is commonly known as the "balloon method" (though I've heard it being called many other things). Here, I have vaguely blocked out what I want the figure to be doing, a basic off center, almost 3/4 profile pose, being careful to define the center line as a reference for symmetry. I'm also making it a bit fancy by foreshortening, or warping perspective, of the left arm out of the page toward the viewer. At this point, the most important thing you should be worry about is proportions and perspective. Don't draw any small details, such as the armor that you will regret to erase later. A properly proportioned and thought out picture with low detail will always look better than an overly detailed but poorly thought out picture. In the case of an Elite, they have tiny little heads perched atop a long neck, a barrel chest, two really long arms by human standards, slim waist, and double jointed knees with two toed feet. Otherwise, pretty much par for course for bipedal figures.
2)ART DISCUSSION. What about the Stick Man Method?
The Balloon method is a spin off of the Stick Man method, but much more powerful if you're looking to present a 3D figure in 2D. As you can see here, I've simplified step 1 into the stick man method. At this point, most of the information about mass is lost. And that is the most important aspect of drawing believable art. The ability to convey a sense of mass. Without mass, a picture looks flat. If you can visualize mass in your head, then the stickman method is a lot faster, because you're only using it to define where the joints are. Otherwise, stick with the balloon method. Personally, I can usually start at 3.
3)Now it's time to draw the flesh around your skeleton figure. If the figure is wearing armor, right now would be a decent time to draw it in too. At this point, the most important thing to do is make sure everything lines up properly and that the masses you defined in step 1 were correct.
4)Tighten the picture and add in the smaller details. Now would be the time to get out the Art of Halo book.
5)Colour if you want to.
This tutorial was made entirely in OpenCanvas with a Wacom Graphire Tablet and took approximately 30-40 minutes to complete. So technically, anyone with a pencil should be able to recreate what I've been able to do here. Action poses use the same principles, just more foreshortening. Recommnended readings if you want to learn more would be Burn Hogarth's Dynamic Figure Drawing and Andrew Loomis' Figure Drawing for All its Worth.
Image size
700x1368px 160.22 KB
© 2004 - 2024 V2Buster
Comments39
Join the community to add your comment. Already a deviant? Log In